
ഇത് ഒരു പിടി മാത്രം മതി.! ഇനി പയർ പൊട്ടിച്ച് മടുക്കും; ചാരം കൊണ്ടുള്ള കിടിലൻ വളം | Payar krishi using charam
Payar krishi using charam
Payar krishi using charam: നമ്മുടെ നാട്ടിൽ വർഷത്തിൽ എല്ലാ സമയവും കൃഷി ചെയ്യാൻ പറ്റുന്ന ഒരു പച്ചക്കറിയിനമാണ് പയർ. ചിട്ടയായ വള പ്രയോഗവും പരിചരണവും ഉണ്ടെങ്കിൽ വളരെ കുറച്ച് ദിവസങ്ങൾ കൊണ്ട് തന്നെ പയർ വിളവെടുത്ത് തുടങ്ങാം. പ്രോട്ടീന്റെ കലവറയായ പയറിലെ വളപ്രയോഗത്തെ കുറിച്ചാണ് ഇവിടെ നമ്മൾ ചർച്ച ചെയ്യാൻ പോകുന്നത്. പലർക്കും ഉള്ള ഒരു പ്രധാന സംശയമാണ്
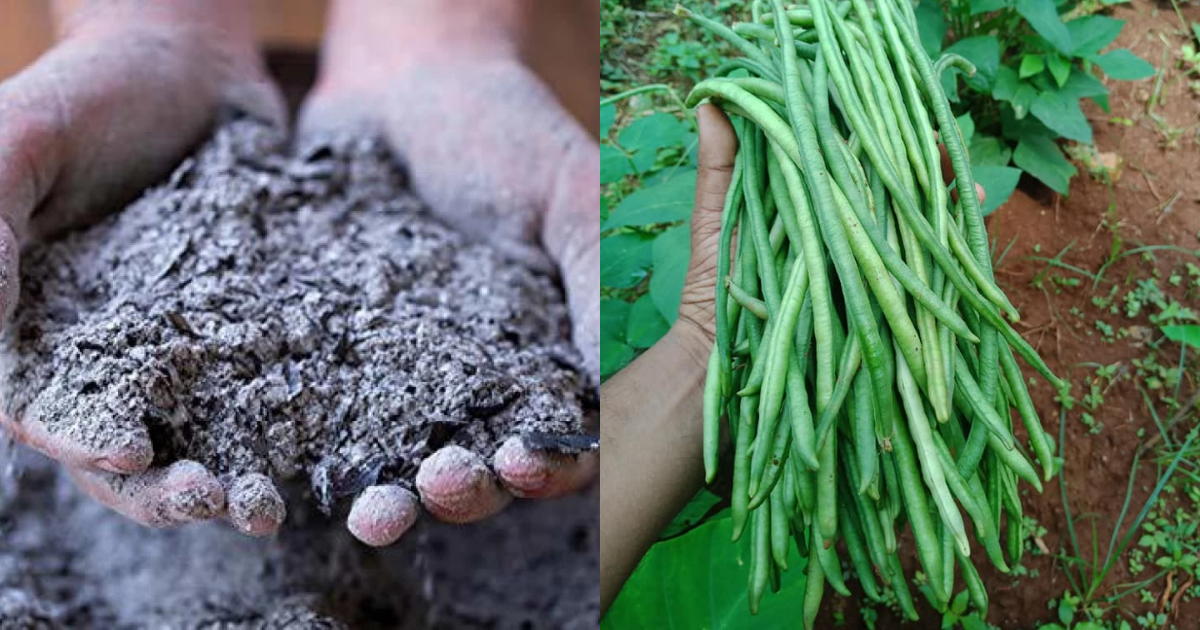
പയറിനകത്ത് ചാരം എങ്ങനെ ഉപയോഗിക്കണം എന്നുള്ളത്. ഈ അറിവില്ലായ്മ കാരണം പലരും പയറിന്റെ ഇലയിലും അസ്ഥാനത്തും ചാരം വാരിയിട്ടു കൊടുക്കും. ചാരം ചൂടായത് കൊണ്ട് തന്നെ പയറിന്റെ ഇലകൾ പെട്ടെന്ന് വാടി പോകാനുള്ള സാധ്യത കൂടുതലാണ്. ഇനി അഥവാ നിങ്ങൾ അത്തരത്തിൽ ചാരം വാരി വിതറുകയാണെങ്കിൽ തന്നെ പത്തോ പതിനഞ്ചോ മിനിറ്റു കൊണ്ട് അത് കഴുകിക്കളയേണ്ടതും അത്യാവശ്യമാണ്. അല്ലെങ്കിൽ തീർച്ചയായും നമ്മുടെ
പയർച്ചെടി മൊത്തത്തിൽ വാടി പോകാനുള്ള സാധ്യത കൂടുതലാണ്. ഇവിടെ നമ്മൾ വളം തയ്യാറാക്കാനായി ഒരു ചെടിച്ചട്ടി നിറയെ ചാരം എടുത്തിട്ടുണ്ട്. അതുപോലൊരു ചെടിച്ചട്ടിയിൽ തുല്യമായി ചാണകം എടുത്തിട്ടുണ്ട്. അതുപോലെ മറ്റൊരു ചട്ടി നിറയെ മണ്ണും കൂടെ എടുക്കണം. ശേഷം ഇവ മൂന്നും കൂടെ നിലത്തോ മറ്റോ ഇട്ട് നല്ലപോലെ യോജിപ്പിച്ചെടുക്കണം.
ശേഷം ഇത് പയറിന്റെ ചുവട്ടിൽ ഇട്ടു കൊടുക്കാവുന്നതാണ്. എപ്പോൾ നമ്മൾ ചാരം പ്രയോഗിക്കുകയാണെങ്കിലും ഈ രീതിയിൽ വേണം എടുക്കാൻ. ഇതിൽ മണ്ണിന്റെ അളവ് കൂടിയാലും പ്രശ്നമില്ല. ഈ മണ്ണും ചാരവും ചാണകപ്പൊടിയും മിക്സ് ചെയ്ത് പയർ ചെടികൾക്ക് എങ്ങനെ ഇട്ടു കൊടുക്കുന്നതെന്നറിയണ്ടേ??? വേഗം പോയി വീഡിയോ കണ്ടോളൂ…
Here are some easy and effective Payar (Long Beans / Cowpea) krishi tips for healthy growth and high yield:
🌱 1. Soil Preparation
- Payar grows best in well-drained soil with good sunlight.
- Mix cow dung / compost before planting to improve fertility.
- Maintain soil pH between 6 – 7.
🌿 2. Seed Selection & Treatment
- Choose healthy, disease-free seeds.
- Soak seeds in water for 4–6 hours for faster germination.
- For better disease resistance, you can treat seeds with Trichoderma powder.
🌧️ 3. Planting Tips
- Sow seeds at 1–1.5 feet spacing between plants.
- Provide support/sticks once the plant starts climbing.
- Best season: June–July or September–October.
💧 4. Watering
- Water lightly every 2–3 days initially.
- Avoid overwatering—Payar dislikes waterlogging.
- During flowering and pod formation, maintain consistent moisture.
🌼 5. Fertilizer Tips
- Apply a mix of cow dung slurry (kunjivellam) or jeevamrutham every 15 days.
- Add wood ash around the plant to boost flowering and pod formation.
- A small amount of NPK (10:26:26) can be applied once at flowering stage if needed.
🐛 6. Pest & Disease Control
- Common pests: aphids, leaf-eating caterpillars, whiteflies.
- Natural remedies:
- Spray neem oil (5 ml per liter) weekly.
- Use buttermilk spray or garlic–chili extract against leaf pests.
- To prevent fungal issues, ensure good air circulation.
🌾 7. Harvesting
- Pods can be harvested in 45–60 days depending on variety.
- Harvest frequently to encourage more flowering.
💡 Extra Tips
- Mulching with dry leaves or coconut husk keeps soil moist.
- Rotate crops to avoid soil-borne diseases.
If you want, I can also give Payar Krishi seasonal calendar, organic fertilizer mix, or pest control solutions.