
കൂർക്ക ഇങ്ങനെ നട്ടാൽ പറിച്ചുമെടുക്കും.! പഴയ പെയിന്റ് ഇനി കളയല്ലേ; കൂർക്ക കൃഷി എളുപ്പത്തിൽ ചെയ്തെടുക്കാം | Koorkka Krishi using paint bucket
Koorkka Krishi using paint bucket
Koorkka Krishi using paint bucket : മിക്ക ആളുകൾക്കും കഴിക്കാൻ വളരെയധികം ഇഷ്ടമുള്ള വിഭവങ്ങളിൽ ഒന്നായിരിക്കും കൂർക്ക ഉപയോഗിച്ചുള്ള കറിയും, ഉപ്പേരിയുമെല്ലാം. അതുകൊണ്ടു തന്നെ കൂർക്കയുടെ കാലമായാൽ എല്ലാവരും കടകളിൽ നിന്നും അത് വാങ്ങിക്കൊണ്ടുവന്ന് ഇത്തരം വിഭവങ്ങളെല്ലാം ഉണ്ടാക്കുന്നത് പതിവായിരിക്കും. എന്നാൽ വീട്ടാവശ്യങ്ങൾക്കുള്ള കൂർക്ക
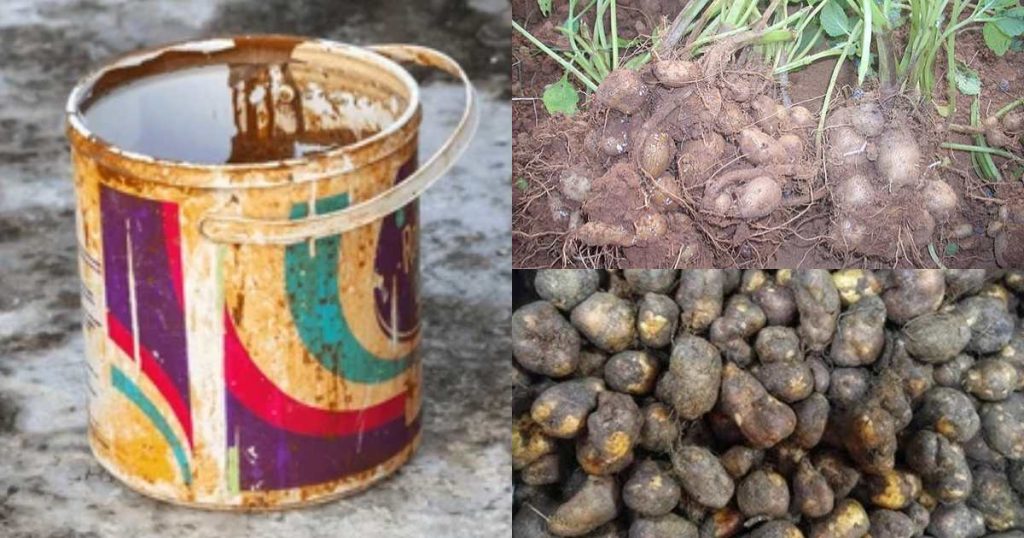
വളരെ എളുപ്പത്തിൽ വീട്ടിൽ തന്നെ കൃഷി ചെയ്തെടുക്കാനായി സാധിക്കും. അത് എങ്ങനെയാണെന്ന് വിശദമായി മനസ്സിലാക്കാം. കൂർക്ക കൃഷി ചെയ്യാനായി പ്രധാനമായും ആവശ്യമായിട്ടുള്ള ഒരു സാധനം പഴയ ഉപയോഗിക്കാത്ത പെയിന്റ് ബക്കറ്റ് വീട്ടിലുണ്ടെങ്കിൽ അതാണ്. അതല്ലെങ്കിൽ സാധാരണ ചെടികൾ നടാനായി ഉപയോഗിക്കുന്ന പോട്ട് വേണമെങ്കിലും ഉപയോഗപ്പെടുത്താം. ആദ്യം തന്നെ പാത്രം എടുത്ത് അതിന്റെ ഏറ്റവും താഴെ ഭാഗത്തായി മുക്കാൽ ഭാഗത്തോളം
കരിയില നിറച്ചു കൊടുക്കണം. ഇങ്ങിനെ ചെയ്യുന്നത് വഴി പോട്ടിന്റെ കനം കുറയ്ക്കാനായി സാധിക്കും. ശേഷം അതിന് മുകളിലായി പോട്ടിംഗ് മിക്സ് ഇട്ടുകൊടുക്കണം. പോട്ടിങ് മിക്സ് തയ്യാറാക്കുമ്പോൾ അടുക്കളയിൽ നിന്നും മറ്റും ലഭിക്കുന്ന വേസ്റ്റ് ഉപയോഗപ്പെടുത്തി ജൈവവളം തയ്യാറാക്കി അത് മണ്ണിൽ മിക്സ് ചെയ്ത് ഉപയോഗിക്കുകയാണെങ്കിൽ കൂടുതൽ ഫലം ലഭിക്കുന്നതാണ്. ശേഷം മണ്ണിനു മുകളിലായി അല്പം ചാരും കൂടി വിതറി കൊടുക്കാം. വീട്ടിൽ ഉപയോഗിക്കാതെ ഇരിക്കുന്ന പഴയ വെള്ള കുപ്പി ഉണ്ടെങ്കിൽ അതിന്റെ മുകൾഭാഗവും, താഴ്ഭാഗവും കട്ട് ചെയ്ത് എടുക്കുക.
അത് പോട്ടിന്റെ നടുക്കായി ഇറക്കിവെച്ച് അതിനകത്ത് കുറച്ച് ജൈവ കമ്പോസ്റ്റ്, ചാരം, മണ്ണ് എന്നിവ നിറച്ചു കൊടുക്കാം. കുപ്പിയുടെ ചുറ്റുമായി വളർത്താൻ ആവശ്യമായ കൂർക്ക നട്ടു കൊടുക്കാവുന്നതാണ്. പിന്നീട് നടുഭാഗത്തായി കുറച്ച് വെള്ളം ഒഴിച്ചു കൊടുക്കുക. വീണ്ടും അതിനു മുകളിലായി കരിയിലയും മണ്ണും ഇട്ട് നല്ലതുപോലെ നിറച്ചു കൊടുക്കുക. ഈയൊരു രീതിയിൽ ചെയ്യുകയാണെങ്കിൽ കൂർക്ക എളുപ്പത്തിൽ മുളച്ച് കിട്ടുന്നതാണ്. വിശദമായി മനസ്സിലാക്കാൻ വീഡിയോ കാണാവുന്നതാണ്. Koorkka Krishi using paint tin POPPY HAPPY VLOGS Koorkka Krishi using paint bucket
Here’s an easy method to grow Koorkka (Chinese Potato / Solenostemon rotundifolius) in a paint bucket 🌿🥔
🌱 Materials Needed:
- 20-liter used paint bucket (cleaned well, with lid removed)
- Drill or nail to make drainage holes
- Soil mix: garden soil + compost + sand (1:1:1 ratio)
- Koorkka tubers (seed tubers with small sprouts)
🪴 Step-by-Step Guide:
- Prepare the bucket:
Make 5–6 holes at the bottom for drainage. If possible, drill a few small holes along the sides near the base for better air circulation. - Add the soil mix:
Fill the bucket three-fourths with the prepared soil mix. Ensure the soil is loose and well-draining. You can also mix in a handful of wood ash or bone meal for extra nutrients. - Plant the Koorkka:
Place 3–4 tubers in the soil, about 3 inches deep, with the sprouts facing upward. Cover them lightly with soil. - Watering:
Water just enough to keep the soil moist—not soggy. Koorkka dislikes waterlogging, so ensure proper drainage. - Sunlight:
Keep the bucket in a partly sunny area (4–6 hours of sunlight daily). Too much harsh sunlight can dry the soil quickly. - Growth & care:
- Water regularly but moderately.
- Add compost or organic fertilizer every 3–4 weeks.
- When plants start spreading, you can gently mound a little more soil around the stems to support new tuber formation.
- Harvest:
In 4–5 months, the leaves will begin to dry. That’s the sign that the tubers are ready! Empty the bucket gently and collect your fresh Koorkka.
🌿 Bonus Tips:
- Don’t throw away the small leftover tubers—save them for the next planting.
- Growing Koorkka in buckets helps control pests and saves space, perfect for terrace or balcony gardening.